|
In every basement, chances are that you'll have some support poles you'll need to frame-in. Unless they all happen to be in a storage area,  you'll need to find a way to conceal them, or somehow make them fit into your decor. Below are some of your options: you'll need to find a way to conceal them, or somehow make them fit into your decor. Below are some of your options:
- Paint the poles: Painting the support poles would be the quickest, easiest way to finish them. However, it's also the least attractive way. Nothing screams "BASEMENT" more than an exposed, painted support pole.
- Conceal the poles: You may be able to enclose one or more of your poles in a wall by framing the wall with 2x6s instead of 2x4s. You may also have the option of using a ½ wall ending with an enclosed framed pole at the end.
- Buy preformed columns: You can purchase hollow decorative columns and use them to conceal the poles.
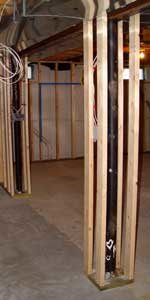
- Frame the poles with 2x4s: This is probably the most common method. You can usually partially conceal one or more of the poles with a ½ wall or full wall. This is the method I'll demonstrate here.

How to frame poles using 2x4s
1. Decide how big to frame the poles: You can choose to frame as close to the pole as possible by cutting ¼ circles out of the four boards making up each of the top and bottom plates. This will leave you with about a 6" framed pole. If you want to frame a pole without any fancy curved cuts (like I did) you'll need to make it around 10" minimum.
FAB TIP: If you're planning to add switches or outlets to the pole, make sure you make the framed in area large enough to fit the fixtures and wiring. Since I'm going to have a 4-gang switch box on each pole, I'll make mine 12".
2. Snap a chalk line: Mark the floor using chalk (or even a pencil and square). If you have two poles near each other, name a line to ensure the will be parallel to each other. You don't want one pole to be off center or turned in relation to the other.
|
|
3. Cut the bottom plates: Using treated lumber, cut two 12" boards. Next cut two 5" boards. These will be the sides running perpendicular to the 12" sides. You may be able to repeat this process for the top plates, however since most ductwork runs along these support poles, chances are you'll have to secure the top using blocking. 
4. Secure bottom plates: Using Tapcon screws or other appropriate fastener secure the bottom plate at the points shown in blue. This will leave space to secure your vertical 2x4s. Secure the long edges first.
![Use Irwin Quick-grip clamps to secure small pieces while you drill and screw into the concrete. [Click to enlarge]](images/using_quick_clamps.jpg) FAB Tip: Use quick-clamps to hold the pieces in place while you drill the holes and insert the Tapcon screws. FAB Tip: Use quick-clamps to hold the pieces in place while you drill the holes and insert the Tapcon screws.
5. Add blocking to secure the top: Cut a couple of 2x4s long enough to run across a couple of joists. This is how you'll secure the sides of the framing at the top. Nail the blocking to the joists using 12D nails.
 6. Measure and cut: Measure the distance from the corners of the bottom plate to the top, and add about 1/8". This will create a tight fit which will make it easier when you toenail the studs. Cut 4 studs to the appropriate length. 6. Measure and cut: Measure the distance from the corners of the bottom plate to the top, and add about 1/8". This will create a tight fit which will make it easier when you toenail the studs. Cut 4 studs to the appropriate length.
7. Secure the studs: Using (3) 8D nails for both the top and bottom of each stud- two near the ends and one on the opposite side in the middle, nail the studs in place. Make sure they're level in both directions, and using a square, ensure that the edges of each make an 90 degree corner.
To see how ours turned out, check out Finishing support poles in the progress section.
|
