|
 If you remember back to basement design decision, I wasn't sure if I would have a wall leading to one of the support poles. After much discussion, my wife and I decided to have a full wall extending 8' from the 'screen wall' to the first support pole. I decided the wall would meet at the edge of the pole (so from one side it would just look like a wall.) If you remember back to basement design decision, I wasn't sure if I would have a wall leading to one of the support poles. After much discussion, my wife and I decided to have a full wall extending 8' from the 'screen wall' to the first support pole. I decided the wall would meet at the edge of the pole (so from one side it would just look like a wall.)
I used the 3-4-5 method to find the exact point along the wall to snap a chalk line. I extended the chalk line across the basement to ensure the pole on the right side would be even with the one on the left.
I then used a square to mark of the other 3 sides of each 'box' that would surround the pole. I decided that I'd need a 4-gang switch box on each pole to accommodate my lighting needs. Since a 4-gang box is about 8 inches, I needed to frame the pole using a 12" enclosure. I also needed to make sure the short side of the 2x4s were on the side of the pole where the switches would go.
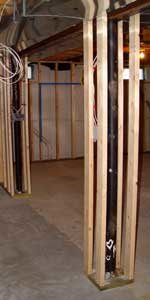 Following the process detailed in framing poles, I cut the 4 pieces for the bottom plate, and the blocking for the top. Next I secured the bottom plate using Tapcon screws, nailed the blocking to the joists using 12D nails. Following the process detailed in framing poles, I cut the 4 pieces for the bottom plate, and the blocking for the top. Next I secured the bottom plate using Tapcon screws, nailed the blocking to the joists using 12D nails.
After measuring each of the corners, I cut (4) 2x4s of the appropriate length, and toe-nailed them with 8D nails. I repeated the process for the other support pole and that was that!
For a more detailed look at how to frame your basement support poles, see "Framing poles" in the "Construction" section.
Additional framing resources
|
