|
 Drop ceilings are one of those things that are much easier to install if you know what you're doing. Luckily my supplier, Interior Resource Supply in Dearborn, Michigan has installers that work at reasonable rates. Drop ceilings are one of those things that are much easier to install if you know what you're doing. Luckily my supplier, Interior Resource Supply in Dearborn, Michigan has installers that work at reasonable rates.
Joe offered to install the grid and tiles for $30/hr and figured it would take between 15-25 hours to complete the entire job. Considering the fact that it would probably take me five times as long to do it myself- and it certainly wouldn't look as good, I figured it best to leave it to the experts!
Installing the drop ceiling grid
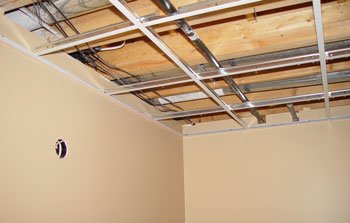
Using a laser level, Joe was able to find the lowest point in the basement (thus the highest he could put the ceiling) very easily. You need to leave about 1 ½ inches below the lowest point to allow space to put in the tiles. I was amazed at how quickly Joe was able to lay the grid.
![Black & Decker laser level [Click for details]](images/black_and_decker_laser_level.jpg) He started with a track completely around the basement. He simply lined it up with the red line of the laser level. Next he began to criss-cross the tracks at 2 foot intervals (since I'm using 24" tiles). He used c-channel around the main ducts, with tiles beneath those too. He started with a track completely around the basement. He simply lined it up with the red line of the laser level. Next he began to criss-cross the tracks at 2 foot intervals (since I'm using 24" tiles). He used c-channel around the main ducts, with tiles beneath those too.
Since we still had to have the electrician layout exactly where the recessed lighting would go, Joe didn't put in any of the tiles on this trip. Once the electrical is complete, he'll come back to finish the job.
Drop ceiling/acoustic tile resources
|
