|
After we decided on Armstrong "Grand Illusions" for the kitchen area of our finished basement (see buying laminate flooring) the next decision was whether or not to install it ourselves. By this point in the project, I was 'burning out' on home improvement. After spending most of my free time during the previous 6 months framing walls, hanging drywall and framing doors, I was ready to be done.
Since the charge to install laminate flooring was reasonable (about $3 per square foot in my area), and since I had never installed laminate flooring before, I decided to have this done by a professional installer. After seeing how quickly it went, I wondered if I should have done it myself! It took two guys about ½ to complete the project.
Have laminate flooring installed or do-it-yourself?
Here are some things to consider when deciding whether or not to do it yourself:
- Is the current floor (fairly) level and smooth? If not, you'll need to add some thinset (a liquid adhesive concrete mixture) to level the floor prior to installing the laminate. This will make your job more difficult, and may be a 'deal breaker' that will help you decide to let a pro handle it.
- Have you ever installed a laminate or hardwood floor? If this is your first time, be sure you know what you're getting into.
- Is the floor you selected a tongue and groove, glueless install? If you need to glue the floor together, your job will be more difficult.
- Knowing it will take you much longer to complete than if you hire a professional installer, do you have the time to spare?
Laminate flooring installation: Step-by-step
Below are step-by-step instructions to help you install laminate flooring- in case you decide to try it yourself. These are meant to be a general guide- some floors may vary. Be sure to read and follow the instructions that came with your flooring!
Laminate installation preparation
1. Stack the laminate flooring - It's important that you stack your cases of laminate flooring inside the house in the same area where you will install it (in our case- the basement). Remove the plastic wrap from the boxes and separate them to let air circulate around them. Temperature and humidity can affect the floor planks, so be sure to do this at least 48 hours prior to installation
2. Clean the basement floor - You want to make sure you sweep or vacuum every little particle of anything off the floor before you begin. You don't want to have the vapor barrier installed and begin laying the laminate planks only to find out there's something under the vapor barrier preventing the floor from lying flat.
3. Remove baseboard - If you're following my steps as you're finishing your basement, you haven't installed the baseboard molding yet. If you're laying a laminate floor and you have baseboard installed, you'll need to remove it now.
4. Install the vapor barrier - Lay the barrier one row at a time going the long way across the room. When joining sheets together, be sure to follow the manufacturer's instructions. Some will have you overlap slightly; others will have you butt the ends of each row against one another.
5. Trim the door jambs - If you've already installed doors and door jambs, you'll need to trim the door jambs in areas where you are laying your laminate flooring. Lay a piece of flooring upside down on your vapor barrier. Use a flat saw or coping saw to cut away the jamb. This will ensure you can slide the floor planks under the door jamb when you get to the edges of your room.
 |
|
Installing laminate flooring
Finally after all the prep is complete, you're ready to install the floor!
1. Lay the flooring planks parallel to the longest wall of your room. Use ½" spacers along each wall to ensure you allow the planks room to 'breathe' as the humidity and temperature of the room changes.
2. Match the tongue of one board to the groove of the next and tap it into place using a piece of scrap wood, or a special grooved tool to protect the boards. Be sure to tap each piece into place so there are no gaps between pieces.
3. When installing each row, be sure to stagger each by six to eight inches. Do not lay the planks so they line up row to row.
4. When nearing the end (when a full piece won't fit) you'll need to cut the last piece to fit. Install all the full pieces first, and do all your cutting at the end.
5. To cut the last plank, put an extra board on top of the last full piece, lining up the edges carefully. Next place another plank over the top of that and slide it against the spacers at the edge of the wall. Draw a line, and cut the last board along the line
6. Follow the above process when you get to the end of the room- when the width (rather than the length) of the board will need to be cut.
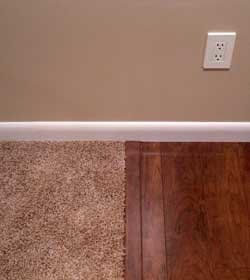
7. Remove your spacers, and install your baseboard to cover the gaps.
8. Install thresholds in doorways or at the break where the flooring ends and carpeting (or other floor type) begins. If you choose to do it yourself, you'll save some money and get the satisfaction of saying "I did it!".
 |
|
|

